eSIM
How to Install eSIM on your Laptop
Stay connected on the move with an eSIM-compatible laptop
Working on your laptop while on the go? If that's the case, you're likely acquainted with the inconvenience of searching for a WiFi hotspot or resorting to tethering from your mobile device. Thankfully, laptops integrated with eSIM technology offer a seamless and effective solution to this issue.


Using Laptops with eSIM Compatibility
The idea of laptops featuring eSIMs turned into a tangible reality with the launch of Microsoft's Surface Pro LTE in 2017. Since the debut of this notebook, a multitude of renowned laptop brands, such as Lenovo, ASUS, Acer, Dell, and HP, have followed suit by introducing their own models with eSIM capabilities.
Looking for a free WiFi hotspot or tethering from your devices are possible options for getting your laptops connected. With free public WiFi hotspots comes the question of security and reliability, along with the fact that you would have to be stationed at the place. Tethering and mobile hotspots on the other hand, while allowing you to move around, place a burden on the battery consumption of your mobile device, which is particularly important when you are traveling. Furthermore, not all carriers allow tethering when roaming.
Compared to the two options above, laptops with eSIM compatibility are an effective alternative. Not only does it provide more flexibility with where and when you get connected, better security, and reliability, but it also decreases the burden on the battery and data consumption of your mobile devices.
Activating eSIM on Laptops
Device Requirements
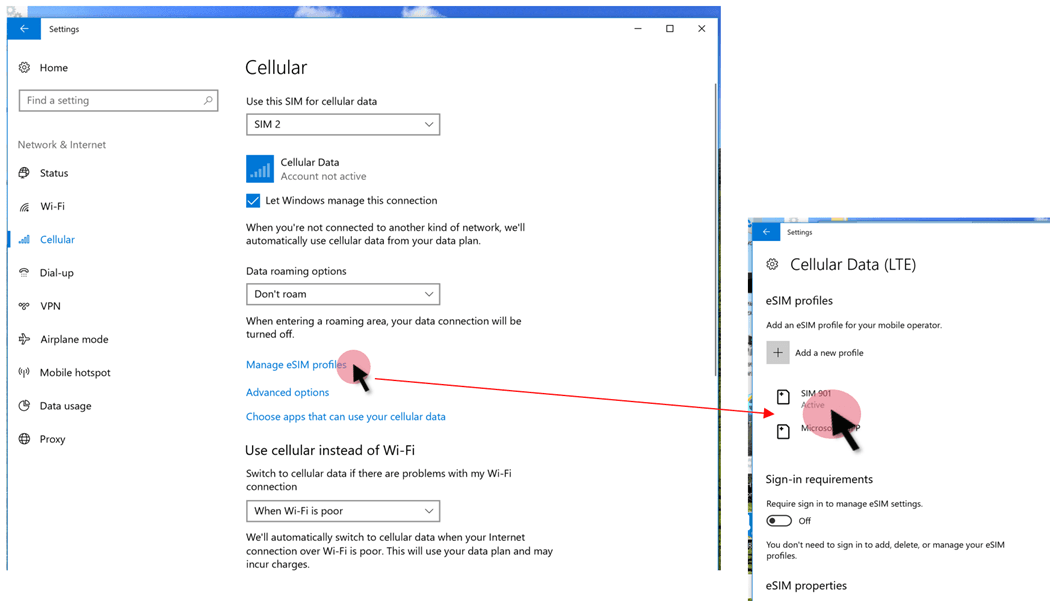
To install an eSIM, your Windows notebook needs to be running at least Windows 10 (version 1703) or later. To check if your Windows laptop supports eSIMs, go to Settings > Network & Internet > Cellular. If you see the option eSIM profiles it means your laptop is able to support eSIMs.
If you are using a Chromebook, it must run on version 92 or later. To check if your Chromebook supports eSIMs, go to Settings > Network > Mobile Data If you see the eSIM option, it means your laptop can support the eSIMs.
How to Install and Activate eSIMs on Windows
- Click Start > Settings > Network & Internet > Cellular > Manage eSIM profiles.
- Select 'Add Profile'.
- Select 'Let me enter an activation code I have from my mobile operator' and select Next.
- Scan the QR code sent to you by your eSIM provider.
- The activation code will appear in the Activation code box and select Next.
- Download your new profile by entering the confirmation code from your mobile operator and selecting Close.
- After your profile is installed, go to Start > Settings > Network & Internet > Cellular > Manage eSIM profiles. Select the eSIM profile that you want (the one you have just installed) and select Use.
- For the prompt 'This will use cellular data from your data plan and incur charges. Do you want to continue?', select Yes.

How to Install and Activate eSIMs on ChromeBooks
- At the bottom right of your screen, select the time > Settings.
- Under “Network,” confirm that Mobile data is turned on.
- Select Mobile data > Add cellular.
- When a QR code scanning screen appears, select Use the camera to scan the QR code.
- To scan, hold the QR code provided by your carrier up to your Chromebook’s camera.
- The activation code will automatically load. If the activation code doesn’t automatically load, type it in manually.
- Select Next.
- When you get the message “Profile has been added successfully,” select Done.
- After your profile has been added, go to Settings > Network and confirm that Mobile data is turned on.
- Under “eSIM,” select the eSIM profile that you want to use.


eSIM Compatible Laptops
Looking for an eSIM-compatible laptop? Check the below list for available eSIM-compatible laptops (updated 15 August 2023)
Acer
- Acer Swift 3
- Acer Swift 7
- Acer TravelMate P2
- Acer TravelMate Spin P4
- Acer TravelMate P6
- Acer Chromebook Spin 511
- Acer Chromebook Spin 513
ASUS
- ASUS Mini Transformer T103HAF
- ASUS NovaGo TP370QL
- ASUS VivoBook Flip 14 TP401NA
DELL
- Dell Latitude 7210 2-in-1
- Dell Latitude 9410
- Dell Latitude 7310
- Dell Latitude 7410
- Dell Latitude 9510
- Dell Latitude 5410
- Dell Latitude 5411
- Dell Latitude 5511
HP
- HP Elitebook G5
- HP Elitebook G6
- HP Elitebook G7
- HP Elitebook G8
- HP Probook G5
- HP Zbook G5
- HP Spectre Folio 13
- HP Elite Dragonfly G2
- HP Spectre Folio 13
Lenovo
- ThinkPad X1 Titanium Yoga 2 in 1
- ThinkPad X1 Carbon Gen 9
- ThinkPad X1 Fold
- ThinkPad X1 Nano
- ThinkPad X12 Detachable
- Lenovo Flex 5G
- Lenovo Yoga C630
- Lenovo Miix 630
- Lenovo Yoga 520
- Lenovo Yoga 720 (2-in-1 models)
Microsoft Surface
- Surface Pro 9 with 5G
- Surface Pro 8 with LTE
- Surface Go 3 with LTE
